We had a huge milestone this week! My little Sirenita rode in the stroller without her car seat for the first time, and loved it! Big deal, right? The weather is beautiful this week and I was planning on taking her on as many walks as possible (72 in January. I love Oklahoma, but the weather is like Calypso, as changing as the sea, so you really have to take advantage of it while you can!). I cloth diaper when we're at home and since she is only four months old, cloth is a little bulky on her. Too bulky for a car seat, so I decided to try putting her directly in the stroller. Low and behold, not only is she fine with sitting in the stroller, but she loved it! A whole new world is now open to her, she gets to see where we're going.
This opens a whole new world to me. She's not quite ready to sit on her own yet, but within a month or two she'll be ready for high chairs, and shopping carts, and swings at the park. So exciting! But so very germy... I'm now working on a cart cover with built in seat belts, and one of those cool "Anywhere chairs" that are a highchair you can roll up and carry with you. On top of that I'm about to convert useless little receiving blankets into light weight sleep sacks, and still whipping up headbands, and bows, and little skirts. Aaaaand, as if that wasn't enough, my brain is swirling with ideas for children's books (I know, right? Baby books? But why not. Maybe I'll be a famous published author.), and things I want to draw and make and sew for my etsy shop, Sweet Sirenita.
I love creating things. More creations means more tutorials and more posts, and more things to share! The funny thing is that I feel most of my creativity has been hidden for so long. I make things all the time, but I don't like to show people. I don't like to expose my creativity, be it written, drawn, etc. So this is a huge step I am taking, trying to make things, sell things, etc. I still feel like my stuff isn't good enough, but maybe I'll get past that. We'll see. But that's one of my "More"s for this year. More creativity, and I need to be less selfish and share my creativity. There should be lots more coming.
The great thing for my blog is while I haven't posted much this week, I've worked on my photography skills and I feel advanced by bounds. So stay tuned; more posts, and prettier pictures coming soon!
Saturday, January 30, 2016
Thursday, January 28, 2016
Failing in order to Succeed
Many, many years ago I had a blog. This was back in the day, where it wasn’t a business, and there were no pictures. It was raw, unedited, emotion. It was your diary online. Like everything else, it seems that blogs have become sugar coated. It’s easy now to hide behind your foil panel and perfect natural light, and make all your images look so perfect. That’s what draws people’s attention, a pretty picture. It’s easy to hide behind your cute tutorials, and make it look like you’ve got it all together. I was reading yesterday in “Knowing the Heart of God” by John Eldredge how the Pharisees had it all together, they were so “righteous,” but the kingdom of heaven belongs to the humble. Not to those who have it all together. To the meek of heart. It made me think. Honestly, it hit home kind of hard. There’s a song by Casting Crowns about how we all go about our “Stained Glass Masquerade.” We pretend that we’ve got it all together. I don’t have it all together. But I sure don’t want to let that show. If you were to ask me, I’d laugh, giving what I think is a humble show, and tell you I don’t have it all together. I’d walk away feeling pretty proud that you think I did, though. It’d probably inspire me to write about how to clean something, so other people can “get it together.”
I don’t want to be a Pharisee. I want to be the humble in heart. I want to be real. I haven’t got it all together. I’m a mess, just as much as you are. We all are. Isn’t that the point of grace, the point of salvation? Some might have a mental checklist going, “Does a daily devotional, check. Talks about grace and salvation, check.” Don’t compare yourself to me. It’s easy to get carried away like that. You don’t see the behind the scenes. You don’t see that this is the first time in years where I have done that, or that I’ll inevitably find myself playing catchup. That I had to buy a “daily devotional” by one of my favorite authors to help get my lazy butt in gear so I’ll actually be consistent. That I’ve asked God to give me a new concept of spending time with him, because my old one doesn’t work.
I’m not sure why the blog came to mind as I was reading yesterday, almost in the afternoon, being honest. No, I don’t get up at 5 am to do it. There’s another failure, right? Aren’t we supposed to do this “first thing?”
I guess the deal is this. I can write. I know I can write. I know I’m good at it. My spelling and punctuation need a little tlc usually, but my content and ideas can catch people’s attention. I can put out a pretty, fake little surface thing about how I’m learning to be mommy and clean the house. I can sugar coat everything, I can be safe. I can leave my heart out, and have it “all together.” I can be a Pharisee. But that isn’t what I’m supposed to do. I’m afraid of failure, of never being good enough. And generally afraid of people finding that out, and seeing into the real me. But if I’m going to do this, that’s exactly what I have to do. I have to fail in order to succeed. I have to put my heart into it. To be real, and humble. I’m not sure what that looks like, but I guess we will find out.
Wednesday, January 27, 2016
How not to decorate a Onesie (and a better way to!)
On my post about Why I love a good Pinterest Fail I mentioned a disastrous attempt at painting a Onesie for my daughter. Let me tell you about my epic fail.
Last year I decorated this cute tea towel. It came out wonderfully. I followed a tutorial on Pinterest on how to make acrylics permanent for fabrics, and voila! Cute towel. When I decided to decorate these plain Onesies for Sirenita, I didn't even consider what paint medium to use. I sketched up some cute designs and got my materials together. See, here they are just begging to be used.

I used the pencils to draw my design. I had puff paint there, juuuust in case. I lined the Onesie with wax paper so it wouldn't go through, mixed my paints with the fabric medium, and away I went!

Hello! There's a reason dinosaurs went extinct! This fellow was an epic fail! Here's my design. He was supposed to be a she, and cute! He became neither. So much for a cute girly onesie. Time to rethink. After talking to The Accountant, I hoped online and looked into options. My hand drawn designs are so much cuter than.. uhm... That.

I decided to try iron on transfers. It was a bit of a bummer. Since I ordered them from Amazon I had to wait several days for them to arrive. Meanwhile, I drew up some new designs. Once they were ready, we scanned them, and because I was using a cream colored drawing pad I asked The Accountant to help me remove the background prior to printing (I didn't exactly want my printer to waste ink on printing a background I didn't want in the first place).

The transfers work great! They're pretty easy to use. Just make sure to flip or "mirror" your image before you use it. I wasted an entire sheet because I figured The Accountant had done it and didn't pay attention when I set them up to print. I was about to iron them on and realized they were going to be backwards. Oops!

If you aren't sure how to mirror them, you can insert the images in Microsoft Word. Go to the Format tab. On the top right, there should be an option for Rotate. Under rotate choose "flip horizontal." Voila! Now you're ready to print your text reversed so it will be the right way once transferred.

Trim around your image as best as you can. Be careful not to get too close to the edges, though! My first transfer was slightly messed up because I got too close to the printed image.

Prior to ironing on you will want to read all the directions carefuly. My transfers say not to use any steam, to press as hard as possible with the iron as hot as possible. Each sized transfer requires a different amount of time. Make sure you position your transfer how you want it before you iron!

Voila! Aren't they cute? They are a little time consuming because of the hand drawing, scanning, background removing process but I love how these came out! They look super cute on Sirenita.
If you would like one for your own little one, you can purchase them on my etsy store: Sweet Sirenita
Tuesday, January 26, 2016
Mom Stuff: The boogie vacuum
Trusting to the nurse, who should know, I got out the blue sucker and commenced operation De-Ogre-fy. Squeeze. Suck. Squeeze. Suck. Squeeze. Suck. Are you kiddding me?! Nothing. I got nothing out with the "much more heavy duty" snot sucker bulb. I found it absolutely useless.
Frustrated, I turned to the internet. I looked up ways to de-congest a baby younger than 3 months. I would love to give some blog credit, but everywhere I looked said the same thing a friend told me before Sirenita was born. Nose Frida.
On a blustery winter day we stopped at walmart. I went in and bought a Nose Frida, some baby saline, and extra filters. Wow. Let me tell you about some Ghost Busters going on in here. Sirenita has had two colds now. The second one was much worse than the first, but we have a far happier baby, because The Accountant and I have been playing Ghost Busters.
Let me explain a few things about Nose Frida. First of all, it's a team project. There is no "I suck the snot out of baby's nose." Nose Frida shows a cute little cartoon picture of a mom sucking the snot from her smiling baby's face. Your baby will not smile when you suck the snot out of their head. Baby will scream like you are trying to suck their brain out through their nose. Be prepared.
Sirenita hates the Nose Frida. We try to use the element of surprise. One of gets ready to suck the snot out, and the other holds the vacuum end for the sneak attack. It takes both of us to coordinate the attack while she screams, but Nose Frida works! It's disgusting. I won't show you a picture. Just think Ghost Busters and Slimer.
We have sucked adult sized nastiness out of that tiny little button nose. As soon as we quit and Nose Frida is out of sight, Sirenita calms right down and lays happily breathing through her nose and playing. Ogre breathing is gone. And no, Nose Frida will not cause permanent mental scaring of your child. My daughter doesn't scream when she sees it. She screams when we suck stuff out of her nose. It's normal, babies generally hate having their noses messed with, be it to wipe with a kleenex, or suck ghosts out.
This thing is amazing. I wish someone would use it on me when I'm sick. If you have a kid, you have to get a Nose Frida.
Thursday, January 21, 2016
Why I love a good Pinterest failure
As much as I wish I was, and strive to be, I am not perfect. Perfection is as illusive as the disappearing Roanoke colonists and just as intriguing. One of my favorite Bible verses is Jude 24, now unto him to is able to keep you from falling away and will bring you with great joy into his glorious presence without a single fault. Ahhh, take that pressure off! Oh, I wish I was perfect, alright. But this is about failure. Failure is important in our lives. Here are four reasons why I love a Pinterest failure.
1)New creations
Failure has been around a whole lot longer than Pinterest. I admit, I sometimes look over pictures of perfectly sculptured cakes, and peoples neatly photo shopped items and wish I could do it. But who would create new recipes if we didn't fail sometimes? Most of us have heard the story of the accidental creation of Toll House Chocolate chip cookies. St. Louis is famous for Gooey Butter Cake, which was also a "failure." The creator inverted the amount of butter and one of the other ingredients. These recipes may not have come out as expected, but what a sad world it would be without chocolate chip cookies!
2)Funny stories
One year when The Accountant and I were newly weds, I decided I wanted to make him sugar cookies for Valentines. The Accountant really loves sugar cookies. I was working two jobs at this point, teaching English in a high school, as well as working part time at the accounting firm The Accountant worked at. My routine at that time was to make up a week's worth of baked goods and freeze the dough on Monday, making it easy for me to pull out whatever I needed and cook it during the week. One day a few weeks before Valentines day I made up sugar cookie dough and put it in the freezer.
A week or so before Valentines days I made Quiche. I really ought to make it more often, it's so good. I make mine with Poblano peppers, corn, and cheese. Yum... So good. I was really looking forward to my delicious Quiche. I remember sitting down to dinner, taking that first bite, and... something was wrong with my quiche. Very wrong. The Accountant couldn't detect anything odd. I found it disgusting; for some unknown reason it was sweet. I used regular pie dough, it shouldn't have been sweet. It was too sweet for me to eat. The Accountant ate both my portion and his. After dinner, as I thought back over cooking the quiche I realized what I had done. I had pulled a ziploc bag with a ball of what I thought to be pie dough out of the freezer. None of the bags of dough in the freezer were labeled. I made my Poblano pepper quiche with a sugar cookie base, instead of pie crust. Dinner and dessert in one, So gross! After Valentines I confessed my error to The Accountant. We had a really good laugh about it, and still do. He insists it was delicious. I refuse to ever make Sugar Cookie Quiche again.
This year we were invited to a picnic for labor day. I wasn't sure what I wanted to take, we had limited time to cook before hand so I thought I'd go with something easy. I found a recipe for adorable lettuce wedge salads on a stick on Pinterest. What's cuter for a picnic than food on a stick? They were super cute and super easy! Theoretically. You know how when you cut up a head of lettuce it doesn't hold together anymore? Yeah... I don't even know how the blogger took a picture of theirs, mine ended up being a few pieces of lettuce on a stick. I'm guessing the whole thing was photo shopped. I didn't have time to make anything else, so I showed up to the Labor Day picnic with a bag full of iceberg lettuce, a bag of tomatoes, a container of bacon, ranch dressing, and a whole bunch of pointy sticks. Hello Pinterest fail! Did my life end over a bag of lettuce and pointy sticks? No, but we sure got a good laugh out of it!
3)Trail and error
I recently decided to paint designs on some Onsies for Sirenita. Last year I found a tutorial (on Pinterest) on making tea-towels using fabric medium. I figured it would work on the Onsie since my towel is adorable. Apparently painting a towel and painting a Onsie are incredibly different. I was trying to paint a dinosaur, but it was so bad I painted "Dinosaurs: Epic Fail" on it, and stuck it in the "Just in case bag" that we carry in the trunk of the car. Unless there is a poop-splosion while we're out and don't have the diaper bag, it'll never get worn.. Haha, can you imagine donating that once Sirenita has outgrown that size? I mean, it's a perfectly good Onsie. Just that my painting is an epic fail. I had a bunch more plain onsies, and a bunch of cute ideas, so we tried something else that worked beautifully. I figured out one way that definitely did not work, but I also found a way that I never would have considered if I hadn't tried and epicly failed first.
4)Finding new skills
I am creative, so I browse Pinterest looking for ideas. I also browse various stores and get ideas from them. I love to make things, most of my home decor is DIY. I draw The Accountant into the creation process too. We try all kinds of crazy new things. Inspired by what I see on Pinterest, I look up tutorials or figure out how to make things myself. Sometimes I fail. Sometimes they come out amazing.
We've done the foil over glue decor thing. Mine looked like a little kid did it. The one on Pinterest looked like an antique made of real metal. I tried the Sharpie mug decorations. Mine wiped right off. I tried a mug painting tutorial, even baked and cured my mug just like they said. Not only did the paint wash off, but it stuck to some of my other dishes and has never come off of them. Go figure. I tried creating decor using a chalkboard. Who knew I am so good at lettering and designs? They come out so nicely that I hate to wash my chalkboard.
Once I found a cute tree shaped shelf that I thought would be adorable in our nursery. When I found out I was pregnant with Sirenita, I asked The Accountant if he could make one. He watched tutorials and studied online quite a bit, and churned out an amazing masterpiece that is so much cuter than we expected. He didn't know he could do carpentry like that, but he gave it a try.
Thomas Edison said, "I have not failed. I've just found 10,000 ways that won't work." I may never make lettuce wedge salads on a stick again, but I had fun. Be inspired to try new things. Don't live your life vicariously, drooling over Pinterest while trying to avoid failure. It may offer you a million different ways to fail you never would have come up with on own, but you may just find something new you never knew you could do!
Wednesday, January 20, 2016
Attack of the Gender Neutral Onsies Part 2: DIY knit skirt


You'll need a shirt and some elastic to do this. If you have an old shirt laying around that you don't want you could use it, or swing by Walmart for one of these cami's. I used a little girl's size 14/16. For a larger child, you could spend a dollar or so more, and use a lady's sized cami. I think they cost about $2.86. Of course, if you don't like Walmart, you could try Forever21 for cheap cami's, or wherever floats your boat.
First measure and cut your elastic. I cut mine about an inch longer than I needed.
I used the size chart from thepinningmama to figure out how much elastic I needed. She also has a great tutorial that I have used for making a tutu, so if you have leftover elastic you can swing over there and make a tutu too! If you are doing a no-sew version and plan on tying the elastic in a knot make sure you cut your elastic longer so you can knot it!
http://www.thepinningmama.com/diy-no-sew-tutu-for-little-girls/
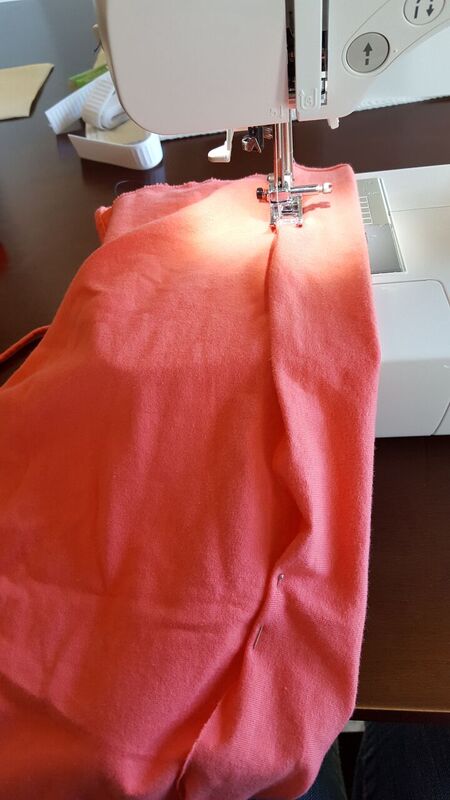
Lay the elastic near the bottom of your shirt and fold the hem over your elastic to measure how big a casing you need to make. You can either flip the raw edge under so it is completely hidden, or leave exposed. Either way, it will be on the inside of the skirt, and knit does not ravel so whatever is easiest for you is fine!

Pin the hem over your elastic, leaving at least 1/4 inch extra so you will have room to sew. Remove your elastic. Sew along the edge of the fold to create the casing. Make sure you leave a small hole to slide the elastic through!
I ran out of bobbin thread and had to take a brief intermission. It reminded me of 80's Saturday morning cartoons. "After these messages, we'll be riiiight back!"

Back to work! You have now sewn almost all the way around the skirt. You've created the casing, and left a hole to thread your elastic through. Now it's time to add elastic. The easiest was is to pin a saftey pin to one end of the elastic, and stick it into the casing. The pin will make it easier for you to grab the elastic and work the end all the way around to the other side of the hole.

Once you've worked the elastic all the way through your casing, you can sew the edges of the elastic together. If you are doing a no sew version, you can tie the elastic together in a knot, or use your fabric glue.

Once you sew the elastic together, you can finish sewing along the edge of your casing to close it. You now have a skirt with edges that look like a new gothic fashion gone wrong.

The great thing about knit is that it doesn't ravel. So just chop those weird edges off. You could do a waterfall skirt, longer in the back and shorter in the front. You could scallop it, or just chop it off straight. It's completely up to you. Whatever you choose to do, just run your fingers along the edge to stretch it slightly. It'll roll up, and you're done!
If you have a full shirt to start with, you could also use the original hem at the bottom of the shirt if you don't want raw edges.

Tuesday, January 19, 2016
Attack of the Gender Nuetral Onsie Part 1: DIY headband
My first thought was to make a bunch of tutus. I made one. It's cute. It's very cute. It sure doesn't look comfortable. It's something I would put on her for pictures, but couldn't expect her to wear all day. Time for a new plan. I thought I'd make a bunch of headbands and bows.
I checked out tutorials on Pinterest, found there were lots of cute options, and decided to go for it. Somewhere I saw that they used an old t-shirt to make headbands for a baby. So I headed over to Walmart for a cheap shirt. I looked all over the baby section at Walmart and the cheapest I found cost $3. I didn't want to spend that much to chop it up. I checked the cloth section but the colors they had for knits weren't very good, and since I was there early there wasn't anyone to cut it. I had nearly given up when I found this Spaghetti strap tank in the girl's section for $1.68.

I can afford to destroy a shirt that cost $1.68. With my destroyable t-shirt now in hand, I looked up my tutorial on Pinterest. Low and behold I couldn't find the T-shirt tutorial! Grrr. Magically, all the tutorials now called for panty hose or required me to sew a tubes. I hate sewing tubes.I decided to give it a whirl and came up with this design.
Start by cutting a strip about four inches wide off the shirt. I started at the bottom, and then cut off the bottom hem.

After removing the bottom hem, pull on the fabric to stretch it out. It will roll up like in the picture below, just like making those t-shirts all the girls used to wear in the 90s where we chopped the bottom off and stretched it out to sew a braid up the sides. Cut this strip in half and remove the hems.

Tie one of the strips of cloth around your subject. This part is the band, so pull it till it's about the size of the child's head. Knit will stretch some, so it's ok if it's a bit smaller than your little one's head.

Now it's time to create the bow. Take the second strip of fabric, and fold a third of it over.

Fold the other side over so that the raw ends overlap slightly in the center. I tucked the edges under the sides just slightly.

Pinch the edges together to make a bow.

Lay your square/bow on top of the sheep's headband. Take the loose end of band, and wrap it around the bow. Tuck it behind the headband and pull it through so that it hangs loose, like the end of a bow.

Now it should look like a bow. I pulled the rolled edges of the center piece apart just enough to sew between them. I did it by hand, and just sewed straight through front to back several times. You could slide this off your sheep and sew it on a sewing machine, sew it by hand, or even glue it. The key is just to make sure you get bow and headband stuck together, and don't sew/glue it to your sheep.

Here is what the back looks like as you're sewing it. It looks a little crazy, but that will be against baby's head anyhow.

Once you've finished sewing, pull the edges of the center piece back together. Snip off any spare threads, and trim the dangly edges of the bow so they are the same size. Now it's ready to wear! Isn't it cute? The band is very versatile and can either be spread out for a wide band, or left rolled up for a smaller band. Since it's made from knit it's very soft and doesn't feel bulky on baby's head!

So sweet!

Subscribe to:
Posts (Atom)